Monday, February 17, 2014

Birthnight Ball

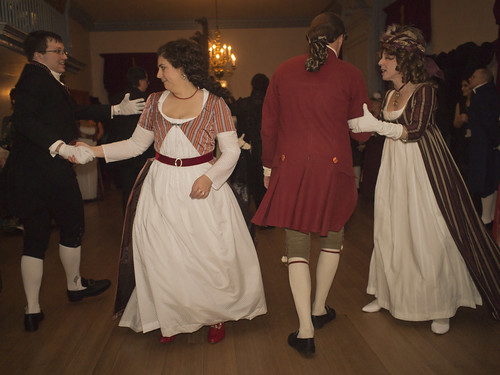
Gadsby's Tavern Museum in Alexandria, VA held a ball on Saturday night to celebrate Washington's birthday. A large group of us decided to go join in the festivities: Maggie, Taylor, Isabella, Glynnis, Amber, Mike, and myself. As usual, the tavern museum provided a beautiful setting for the many costumers and dancers in attendance. The dance calling was great, and I think I am finally remembering a number of the steps consistently (I had rights and lefts on lock).

On to the photos!

Birthnight Ball 2014

Birthnight Ball 2014

Birthnight Ball 2014

Birthnight Ball 2014

Birthnight Ball 2014

Birthnight Ball 2014

Birthnight Ball 2014

Birthnight Ball 2014

Birthnight Ball 2014

Birthnight Ball 2014

Birthnight Ball 2014

Birthnight Ball 2014

Birthnight Ball 2014

Birthnight Ball 2014

All of my photos are here.

Friday, February 14, 2014

Cross That Off My Sewing Bucket List

I have finished a Francaise gown! A short time ago I never would have attempted this style. Heck, I hadn't even made much 18th century clothing until a couple years ago. I am very happy with the finished result. I lost a little steam on the trimming (so many rows of braid!), but yesterday I put on the final touches. Totally done!

I have to give a ton of credit to several really helpful posts that walked me through how to construct a Francaise:
-Katherine's Sacque Tutorial
-Kendra's Mourning Gown Dress Diary
-Maggie's Gold Francaise Dress Diary

Green Francaise

Green Francaise

Green Francaise

Green Francaise


Thursday, February 13, 2014

Blog Giveaway

Edited to add: the giveaway has now closed, thanks to everyone who entered!

I am holding a blog giveaway for the necklace pictured below, in celebration of the opening of my Etsy shop. Head on over here to enter!

In the Long Run Designs

And here is the link to my shop.

Sunday, February 2, 2014

Pearl and Rhinestone Parure

I'm continuing to teach myself new jewelry making techniques. This set was an exercise in threading multi-strand necklaces, in making eye loops from headpins for pearl drops, and in using epoxy clay. I was really worried about using the clay, but I needed a way to stick on a wire loop from which I could attach the teardrop pearls to the bottom of the rhinestone components (there is no place to attach anything otherwise). I hate using glue, because I find it either sticks too much (when I'm applying it) or too little (when it chips off later). This despite experimenting with several jeweler's glues. But I think I've found a solution with the epoxy clay. The pearl dangles seem to be very securely attached now.

Below is the result (with a sneak peek of the trim on my almost finished francaise). A necklace, earrings, and a pin. It is inspired by this 1810s painting of Empress Marie Louise.

Pearl and Rhinestone Parure

The Accessory: Pearl and Rhinestone Parure
Historical Period: Inspired by an 1810s necklace, but I will wear this with a variety of late 1700s and early 1800s formal outfits
Outfit It Accessorizes: I am planning on using this with both 18th C and Regency
Materials Used: Glass pearl rounds and teardrops, rhinestone slide beads, beading wire, crimp tubes, crimp tube covers, one box clasp, jump rings, epoxy clay, earring findings, headpins
Techniques Used: Bead stringing on wire, attaching a box clasp with folded crimps, wrapping headpin loops, attaching rings using epoxy clay

Saturday, January 25, 2014

Regency Hairpiece

My hair does not curl without a lot of work, work which I'm usually unwilling to do. The solution? Fake hair, obviously. I bought two hairpieces: the Boho Double Braid and the Vintage Locks by Forever Young. I cut some of the curls off of the Vintage Locks piece, and sewed them to the double braid, to give a curled bangs effect. Then I sewed a couple wig clips to the braid, so I can keep it from sliding back. The Vintage Locks clip still works, even though I took off some of its curls.

Hairpiece

Hairpiece

The Accessory: Regency hairpiece
Historical Period: 1790-1810
Outfit It Accessorizes: I am planning on using this with a variety of regency period outfits
Materials Used: Two purchased hairpieces, brown thread, glue, wig clips
Techniques Used: Hand sewing

Tuesday, January 21, 2014

Cosplay Photo Shoot!

Yesterday Mike and I did a photo shoot with Beth of BWPW Photography. Beth is awesome. She did a great job scouting multiple locations beforehand and researching poses that appear in the original source comics. Not to mention the photos she took. It will be a little while before she finishes post processing on them, but I could already tell from the previews yesterday that the shots are beautiful. If you are ever in the Raleigh-Durham, NC area, I highly recommend booking a session with Beth.

These are some snaps from my phone, showing Beth and her helper Darrin at work.
Photo shoot with BWPW Photography

Photo shoot with BWPW Photography

Photo shoot with BWPW Photography

Friday, January 10, 2014

18th C Short Cloak

For many months I have had this nice wool melton in the stash that I had been saving for a cloak. What better time to make one than in the heart of the winter holiday season? I did a lot of the sewing while hanging out with my family over Christmas. But I only just put the ties on this morning, as it took me a while to get some wool tape. I ended up using a contrasting color for the tie strings, because the unique teal color of my fabric was unlikely to exactly match most wool tapes. And I wanted to use wool tape instead of silk ribbon, which is much more slippery and can slowly become untied.

I constructed this based on instructions and images from two great sources: this article by Sue Felshin on The Hive Online and this tutorial put together by Katherine C-G on her blog. These two pages have just about all the information you need to know about making your own cloak. The art is all in the cutting--the sewing itself is simple, although you will likely have to do it by hand, since wool melton is so thick.

Here is the front of the finished cloak.
Short Cloak

And the back.
Short Cloak Back

In order to check sizing and how the collar would fall, I made a mockup out of muslin before working in my wool.
Mockup of Short Cloak, Front

Cutting things out--the body of the garment is almost a half circle, with some piecing.
Cutting out the short cloak

Death Comes to Pemberley (and Chatsworth House)

Pemberley

I'm a little behind the internet on this, but I have now watched Death Comes to Pemberley. I found the acting and story pretty enjoyable, while the costuming was okay. But the real star of the show was Chatworth House, which stood in for Pemberley. There was some lovely footage of both the gardens and interiors. It made me remember when I visited there with Mike back in 2008. I highly recommend putting it on your "to visit" list!

Chatsworth Hallway

Chatsworth

Statue Hall

Chatsworth

Wednesday, January 8, 2014

More Progress

Most of the major construction is done on my francaise! But it needs a lot of trimming.

Francaise Progress

Monday, January 6, 2014

Regency Holiday Party

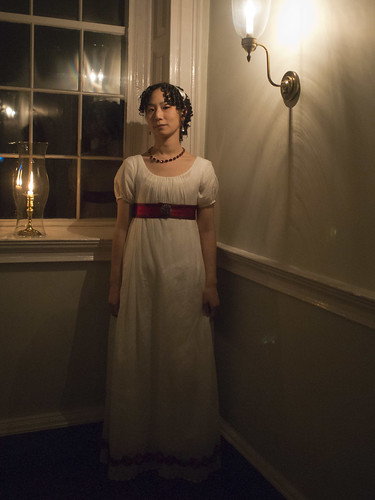
Thank you Alice for organizing such a lovely party! And thank you to the Philly crew for pitching in to put together such a great spread. The setting was just perfect--I totally felt transported back in time. And everyone had such beautiful outfits and jewelry (much of the latter provided by Taylor of Dames a la Mode). I very much enjoyed getting a chance to catch up with so many local and semi-local costumers.

On to the photos!

Regency Holiday Party

Regency Holiday Party

Regency Holiday Party

Regency Holiday Party

Regency Holiday Party

Regency Holiday Party

Regency Holiday Party

Regency Holiday Party

Regency Holiday Party

Regency Holiday Party

Regency Holiday Party

Regency Holiday Party

Regency Holiday Party

Regency Holiday Party

Regency Holiday Party

Regency Holiday Party

Regency Holiday Party

Regency Holiday Party

Regency Holiday Party

Regency Holiday Party

Regency Holiday Party

All of my photos are here.